
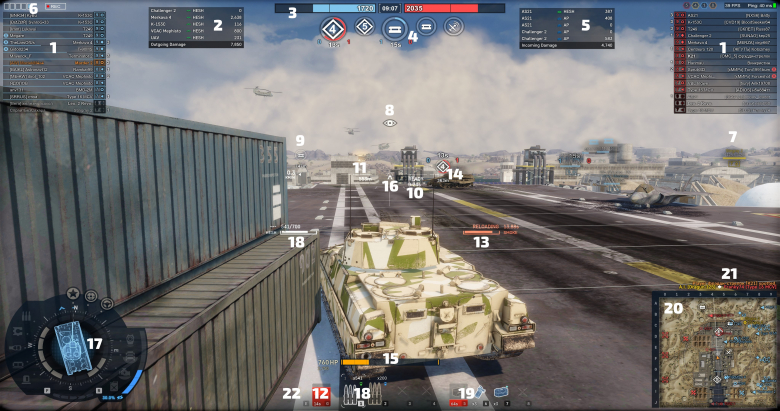
The Battle Interface in Armored Warfare contains a number of elements that allow players to observe and evaluate the battlefield situation around them.
Click the image to open a larger version
- 1) Your and Enemy Team Lists – shows the list of players and their clan tags on each team
- 2) Outgoing Damage – the list of targets you have damaged in battle and the amount of damage you have done (can be enabled or disabled in the UI Settings)
- 3) Remaining Points – this counter is specific to Global Operations (for more details, see the Global Operations guide)
- 4) Objective Indicators – this counter is specific to Global Operations (for more details, see the Global Operations guide)
- 5) Incoming Damage – the list of enemies that have dealt damage to your vehicle in battle (can be enabled or disabled in the UI Settings)
- 6) Team Format Buttons – these allow players to change how team members are displayed. To change the team format, hold Ctrl to display the mouse cursor and click on the respective buttons
- 7) Enemy Vehicle Indicator – shows enemy player information, including (clockwise) their Battalion, Name, Vehicle, remaining Hitpoints, Tier and Class (this can be customized in the UI settings)
- 8) Spotted Indicator – yellow eye icons shows that your vehicle is seen by other players, it turns grey when your vehicle is about to disappear from enemy sight
- 9) Wildcard Indicator – shows the position of nearby Wildcards (for more details, see the Global Operations guide)
- 10) Reload Timer – shows the time it takes to reload a shell
- 11) Enemy Distance – shows the distance to the targeted enemy
- 12) Smoke Grenades Counter – shows your smoke grenades available
- 13) Smoke Grenade Reload Timer – shows the time it takes to reload a smoke grenade launcher
- 14) Objective Indicator – shows the position of a nearby objective to capture
- 15) Hitpoint Indicator – shows the remaining and maximum Hitpoints along with the green health bar
- 16) Aim Reticle – this is where your shots will go, the size of the circle indicates accuracy, the color of the reticle indicates the chance to penetrate (Red – shells will not penetrate, Yellow – shells may penetrate, Green – shells will penetrate)
- 17) Vehicle Indicator – this icon shows the direction of your vehicle and your turret as well as module damage (damaged components are shown as yellow, destroyed as red)
- 18) Ammunition Indicator – shows the type of shell selected and loaded (shells are designated by colors – blue for kinetic, red for HEAT, green for HESH and yellow for HE shells)
- 19) Consumables indicator – shows the available consumables that can repair your modules, heal your crew or put out an engine or fuel fire
- 20) Minimap – shows the position of your allies, discovered enemies, objectives, the distance you can spot your enemies at (the small circle) and the distance you can actually see the enemies someone else spotted (the large circle)
- 21) Log Messages – shows what's happening on the battlefield (enemy kills, your allies activity)
- 22) Active Ability – shows your available active ability (such as Designate, Mechanized Infantry etc.)
Vehicle Status Indicator in Detail
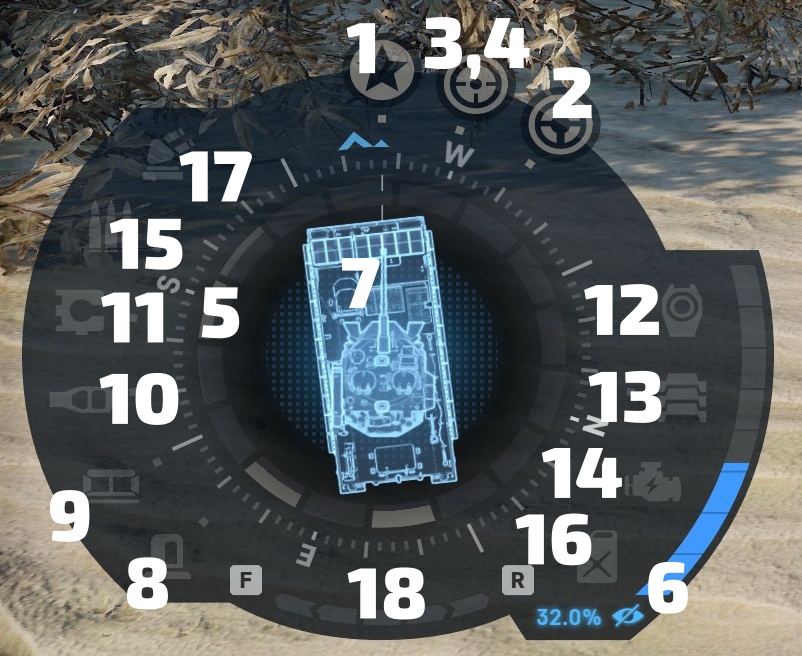
- 1) Crew Indicator (Commander) – this row of icons shows the status of crew members. Wounded crew members are shown as yellow or red, depending on their condition. Wounded commander reduces overall performance
- 2) Crew Indicator (Driver) – wounded driver reduces vehicle mobility
- 3) Crew Indicator (Gunner) – wounded gunner reduces gun accuracy
- 4) Crew Indicator (Loader) – wounded loader reduces reload times (please note that some vehicles do not have a loader, their guns are loaded automatically)
- 5) Cover Indicator – the grey bar shows the direction from which the vehicle is covered either by obstacles or by bushes providing camouflage bonus
- 6) Camouflage Indicator – this scale shows how well the vehicle is hidden on the battlefield – the more filled it is, the harder your vehicle is for the enemy to spot
- 7) Vehicle Indicator – this icon shows the direction of your vehicle and your turret as well as module damage (damaged modules are shown as yellow, destroyed as red)
- 8) Module Indicator (Commander Sights) – this row of icons shows the status of modules (damaged modules are shown as yellow, destroyed as red). Damaged modules reduce vehicle performance. This icon represents the Commander Sights – damaging them reduces the vehicle's view range
- 9) Module Indicator (Gunner Sights) – damaged Gunner Sights increase gun aiming time
- 10) Module Indicator (Cannon) – damaged Cannon decreases gun accuracy
- 11) Module Indicator (Loading Mechanism) – damaged Loading Mechanism increases vehicle's reload time
- 12) Module Indicator (Turret Ring) – damaged Turret Ring reduces the rate with which a turret turns (traverses)
- 13) Module Indicator (Tracks) – destroyed tracks or wheels immobilize a vehicle
- 14) Module Indicator (Engine) – damaged engine significantly reduces vehicle's mobility, destroyed engine immobilizes it
- 15) Module Indicator (Ammo Rack) – damaged Ammo Rack increases vehicle's reload time, destroyed Ammo Rack can cause a fire that will destroy your vehicle if not extinguished quickly
- 16) Module Indicator (Fuel Tank) – damaged Fuel Tank has no effect, but destroyed Fuel Tank can cause a fire that will destroy your vehicle if not extinguished quickly
- 17) Module Indicator (APS) – damaged APS will not work as often, destroyed APS will not work at all
- 18) Cruise Control Indicator – press R once to continuously go forward slowly, press twice for maintaining maximum forward speed
Share


